Many organisations have experienced the benefits of reuse with service-oriented architecture but what about reuse across your mobile solutions? Here at Intelligent Pathways we love reusing core functionality across our iOS mobile applications to maximise cost efficiency for our clients and speed up the time to market of our solutions.
In this blog we’re going to explain how you can best reuse components of your applications using Cocoapods.
Choosing an approach for reuse
Before you can reuse parts of your application, you must first recognise the different components and separate out the functionality you would like to reuse. After that, as with most things in technology, there are multiple approaches available to you for reuse.
The most obvious option, and the simplest in the short term, would be to manually copy the technology source code from the first application. But, as we all know copying code is never a good idea. Aside from being error prone, it also results in you having to manually merge the updates every time there is a new release which is not very sustainable in the long term.
The next option is to build a static library out of your component and distribute it to your other applications. However, this option does not take care of the distribution of new releases and you would still need to manually update all the applications using the component.
The final option is to create an integrate-able component using a dependency manager which will distribute new releases of the software without the need for any manual work.
In the iOS community, the most popular dependency manager in use is Cocoapods.
We’ve used Cocoapods to reuse functionality across several Intelligent Pathways mobile applications. We’re going to use our Notifications functionality, available in our aviation mobile solution Jetstream and our mobile forms solution ClipForms, to take you through the steps of building a reusable component.
Getting started with Cocoapods
In Cocoapods terminology, a component like our Notifications functionality is called a Pod. I will first show you how to create a Pod with CocoaPods, using Git as the version control system.
In our project’s root directory, we create a specification of our Pod in a file named Notifications.podspec
A specification file should include:
- A pointer to the project tag/version (see s.source property)
- A pointer to source code, assets and required resources (see s.source_files and s.resources properties)
This is what the Notifications system specification will look like:
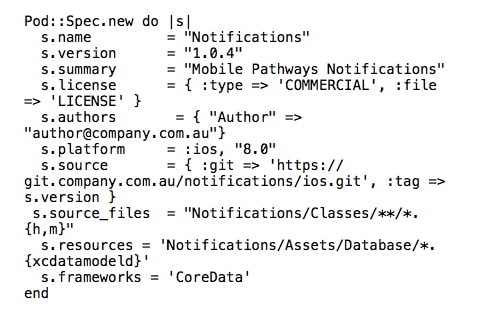
Note that from this specification file all code related to the Notifications pod has been extracted into a folder named Notifications.
After creating this specification file, we can now tag the source code using Git to release our Pod as version 1.0.4. This version can then be used by any other application.
In this case, we would like to publish this Pod internally only. To do this, we need to create a private Pods repository.
Creating a private Pods repository
A Pods repository is hosted in a Git project. To create our own private Pods repository, let’s create a new Git project called “ip-pods”.
Inside this project, we create a directory named ‘Specs/Notifications/1.0.4’.
We then copy the Pod specification Notifications.podspec file inside the 1.0.4 folder.
Integrating a Pod into another application
To integrate our Notifications Pod into a new application, we first need to install Cocoapods by running the following command:
sudo gem install cocoapods
Then, we need to instruct Cocoapods to add our private repository. We do this by adding our private repository Git project ‘ip_pods’ to Cocoapods using the following command:
pod repo add ip_pods https://git.company.com.au/ios-libs/ip-pods.git
Now, let’s tell Cocoapods that we would like to use Notifications in this application. We do this by creating a file named “Podfile” in the new application directory. The Podfile should look like the following:
source ‘https://git.company.com.au/ios-libs/ip-pods.git’
pod ‘Notifications’, ‘= 1.0.4’
Note, we can omit the version number in order to always use the latest version of the Pod.
We then make Cocoapods process that file and retrieve our Notifications Pod version 1.0.4 by running the following command
pod install
We can now start using our Notifications functionality in our new application.
As mentioned earlier on, when a new version is available, we would like the ability to update that Notifications Pod for every application that uses it. This will help us to quickly benefit from all new features.
To update Pods within our new application, update the Podfile with the new version numbers before running the following command:
pod update
Want to know more about Cocoapods?
Visit the official Cocoapods website https://cocoapods.org/