


Any CI/CD pipeline that deploys resources into AWS will be required to provide credentials during the execution of the pipelines. When using a pipeline like AWS CodePipeline, its native integration into AWS using IAM Roles provides this transparent entry into AWS. Many of our clients use Atlassian Bitbucket and Bitbucket Pipelines for deploying AWS infrastructure and applications. As this executes outside of our AWS environment, we need to provide credentials to be used by the pipeline to deploy into AWS.
A standard approach to this would be to:
- Create an IAM user in the target AWS Account
- Grant suitable permissions to that IAM User (or via a Group) to enable it to deploy the resources
- Create security credentials (Access keys)
- Record these Access/Secret keys somewhere secure
- Add them as Repository/Deployment variables in the Bitbucket Repository Settings.

While the above process achieves the desired goal, it has a high level of setup overhead, as well as increased security risk profile.
A review of AWS Identity and Access Management best practices (found here) highlights some of the shortcomings of the above approach:
- Use roles to delegate permissions where possible
- Do not share access keys
- Rotate credentials regularly
- Use policy conditions for extra security
Therefore it is clear there is room for a more secure and best practice approach.
OIDC (OpenID Connect) Federation to the Rescue
What is OpenID Connect?
From the https://openid.net website:
“OpenID Connect 1.0 is a simple identity layer on top of the OAuth 2.0 protocol. It allows Clients to verify the identity of the End-User based on the authentication performed by an Authorization Server, as well as to obtain basic profile information about the End-User in an interoperable and REST-like manner.“
Both Bitbucket Pipelines and AWS IAM support OIDC authentication flows.
At a high level, to avoid the use of IAM Access keys we will set up a trust relationship between Bitbucket Pipelines and AWS IAM in the target AWS Account.
This involves the following steps:
- Lookup the Bitbucket Pipelines OIDC provider URL and audience in your repository settings.
- Register a new AWS IAM Identity Provider
- Create a new AWS IAM Role that will be used by the pipeline for deployment into AWS
-
-
- IAM Role is configured to be assumed only by the federated OIDC Identity Provider
- IAM Role can only be assumed from one of the IP Addresses used by Bitbucket Pipelines
-
Bitbucket OpenID Connect
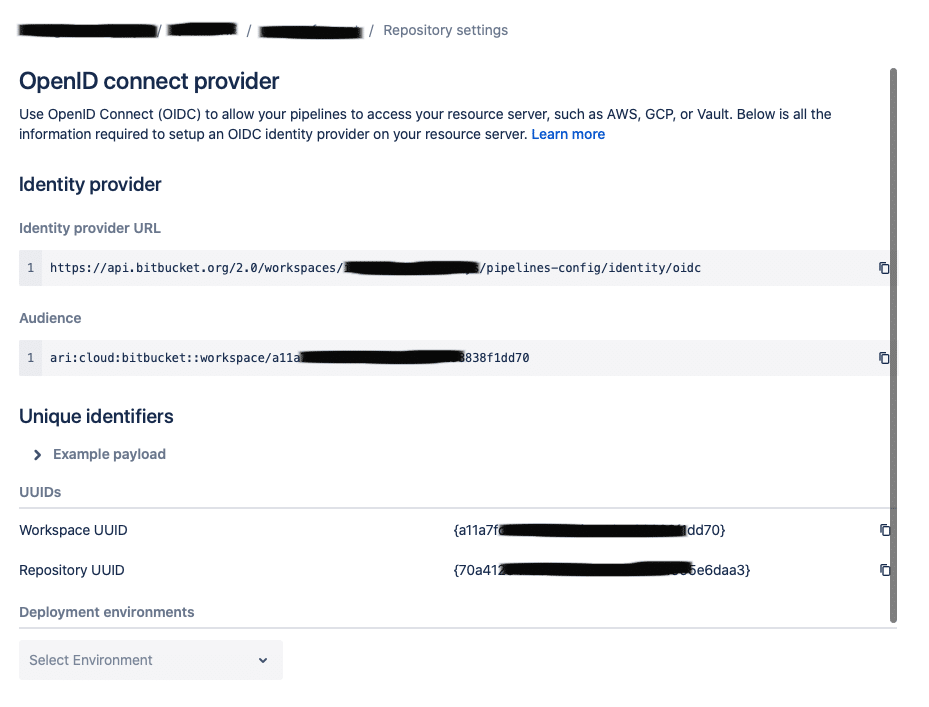
The OpenID Connect settings can be found under the Repository Settings.
Note: The “Identity provider URL” and “Audience” will be identical for all Repositories in the same Bitbucket Workspace.
AWS IAM Identity Provider
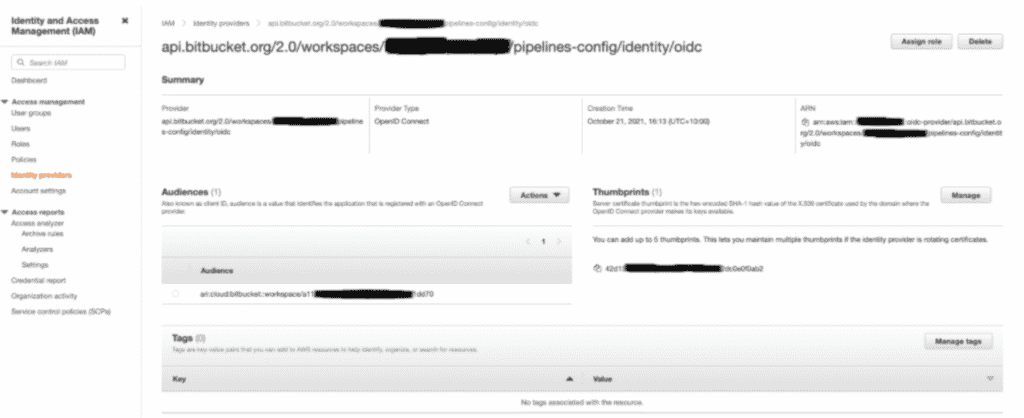
Now that we have the “Identity provider URL”, we can set up an OpenID Connect Identity provider in AWS IAM.
Whilst this could be done directly in the AWS Console, we prefer to automate this crucial step. AWS CDK is our preferred Infrastructure as Code framework, so we have used this to deploy the required AWS resources.
To get the full code and method using Amazon CDK, follow the link here.
The end result of the setup should look similar to the screenshot below:
IAM Deployment Roles
Now that we have the IAM OpenID Connect Identity Provider configured, we can start creating some IAM Roles that will be used by the Pipelines.
The deployment role will need to be created such that only the Identity Provider configured above is permitted to assume it, and only then from one of the registered IP Addresses used by Bitbucket Pipelines.
This IAM Role will need to have the following permissions:
- ReadOnlyAccess (AWS managed policy)
- AWSCodeArtifactReadOnlyAccess (AWS managed policy – only required if you use AWS Code Artifact)
- A custom policy that grants permissions to CDK to deploy resources on your behalf:
- Any Resource as long as it’s deployed via CloudFormation
- Allows upload assets to the CDK staging buckets
- Allows access to validate/create/execute/delete CloudFormation change sets.
To get the full code and instructions for using Amazon CDK click here.
Some important parts of the details when creating this IAM Role:
- The ‘CDKDeploymentRole’ can only be assumed by the Bitbucket OIDC Federated Principal
- The ‘CDKDeploymentRole’ can only be assumed if the requests are coming from one of the listed IP Addresses
- It grants ReadOnly to ALL resources. This is required if CDK or your pipeline needs to perform lookups (e.g. VPCs)
- It grants the ability to deploy any resource as long as it’s done via CloudFormation
- It grants access to the S3 bucket setup by bootstrapping your CDK toolkit
-
-
- Assumes the toolkit followings the naming pattern: “cdk-*stagingbucket*”
- Or “cdk-hnb659fds-assets-*” for CDK v2
-
- It grants access to retrieve and publish to AWS CodeArtifact
- It grants access to create and execute AWS CloudFormation ChangSets/Stacks
- It grants access to AssumeRole and PassRole for deploying using CDK v2
Important: if you copy the above, please review and assess point #4 above and verify this is suitable for your needs!
Note: Bitbucket Pipelines also provides identifiers that can be used to lock down this IAM Role to a particular Repository Pipeline and Deployment Environment. Assess if this is needed for your own CI/CD setup, however setting up a Role per repository per environment will create substantial overhead in setting up the pipelines.
Deploying from Bitbucket Pipelines
Now that we have the OIDC Connect Provider, and an IAM Deployment Role we can now configure our pipelines.
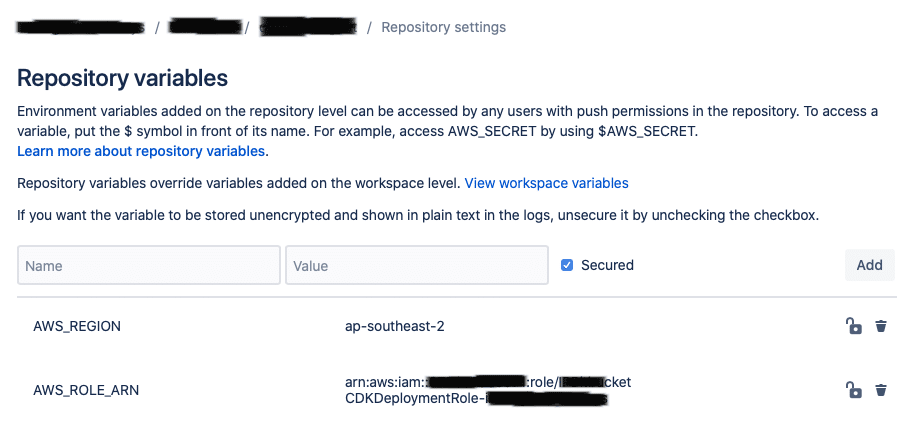
- Add the ARN of the IAM Deployment Role as a Deployment Variable named “AWS_ROLE_ARN”
- Configure at the Repository or Workspace level the “AWS_REGION” variable (e.g. ap-southeast-2)
- Update your steps to enable OIDC
- Configure the required AWS WebIdentity environment variables in the Step.
Configure the AWS_ROLE_ARN and AWS_REGION
Enable OIDC for Pipeline Steps
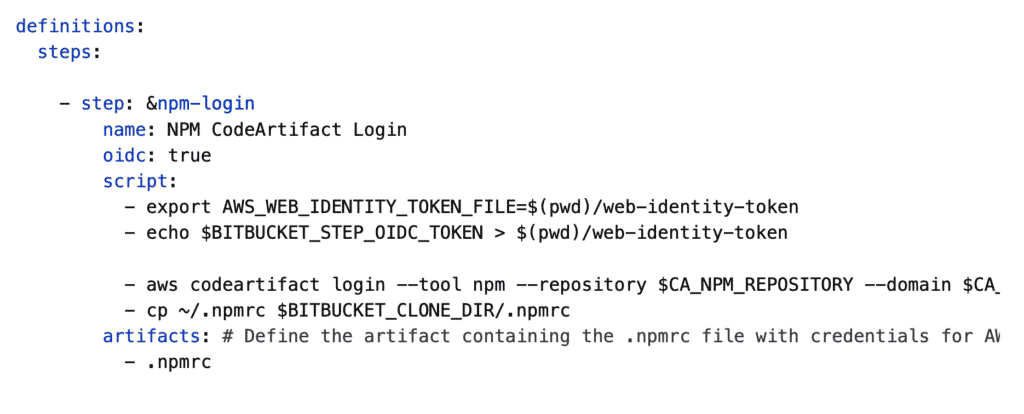
All we need to do to enable OIDC is to add to the following step:
oidc: true
As per the documentation here, we simply need to add the “AWS_WEB_IDENTITY_TOKEN_FILE” environment variable.
– export AWS_WEB_IDENTITY_TOKEN_FILE=$(pwd)/web-identity-token
– echo $BITBUCKET_STEP_OIDC_TOKEN > $(pwd)/web-identity-token
This example shows a complete Step that will perform a npm login to AWS CodeArtifact
The AWS CLI and SDK base commands (include AWS CDK, boto, etc) will now automatically pick up the AWS_ROLE_ARN, AWS_REGION, and AWS_WEB_IDENTITY_TOKEN_FILE variables and perform the AssumeRoleWithWebIdentity call for us.
Wrap up
With all of the setup above in place, our pipelines are now more secure: there are no more IAM Credentials/secrets required, and the deployment role can only be assumed by Bitbucket Pipelines.
Please take the time to assess if these policies are suitable for your own needs.